In the first two parts of this quick and dirty series, you learned how to write a script to run a Croquet world, and how to execute that script within the Squeak environment. But selecting your code, doing an "accept" and "do it" every time you want to start a world can become tedious. Wouldn't it be great if you could just click a button to start your world?
That is precisely what we are going to learn how to do in this tutorial.
Learning Outcomes:
Upon completion of this lesson, the learner will be able to assign a script to a button in Squeak and change the name of the button.
Step by Step Guide:
1. Launch Squeak and open a new project.

 2. Open up an "Objects" window.
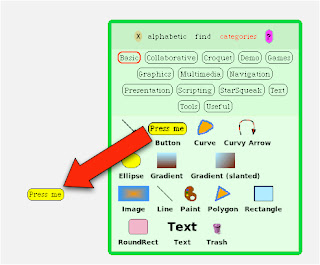
3. Select "Basic" from the "Objects" window.

4. Click and drag the "button" icon from the "Objects" window into your workspace.

5. Command-click (or right-click) the button you just dragged into the workspace. You are presented with a halo.

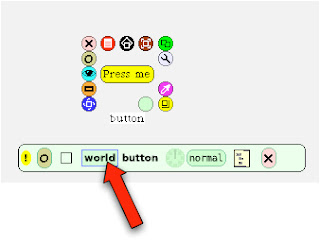
6. Select the green button towards the bottom-right of the halo. You are presented with a tile pane.


7. Click on the "world" section of the tile pane. You are presented with a contextual menu.

8. Select "show code textually" from the contextual menu. An editing space will appear.

9. Delete all text in the editing space except for the word "button".

10. Copy and paste the following code into the editing space below the word "button":
| myVariable |
myVariable := CroquetMaster new.
myVariable position: 100@100.
myVariable extent: 640@480.
^myVariable openInWorld.
 11. Select all of the text except for the word button, alt-click, and select "accept" from the contextual menu.
12. Select the "O" button (second from the left) at the top of the tile pane. This will close the tile pane.

13. Since the title on the button ("press me") is not very descriptive, let's change the title. Command click (right-click) the button. You are presented with a halo. Select the "Menu" button. You are presented with a contextual menu.

14. Select "change label" from the contextual menu. You are presented with a dialogue to add a new label to your button.

15. Provide a name for your button and select "Accept." I have chosen to name the button "My Croquet World."

16. Success! You can now click on the button to run your script. You will be presented with a world based on the CroquetMaster subclass.

Advanced users:
Experiment with the various options using the halo and its contextual menus to create a more attractive button.
Challenge:
Can you create a button that looks like the following?
Summary:
In this lesson, the learner learned to assign a script to a button in Squeak and how to change the name of that button.
Conclusion
This concludes the quick and dirty series on getting a Croquet world running. In this series, the learner acquired the following abilities regarding the core concepts of the Croquet SDK:
1. How to create a new Squeak project.
2. How to open and use a workspace.
3. How to open and use a class browser in a fundamental manner.
4. How to execute scripts in the Squeak environment ("accept" and "do it")
5. How to understand basic scripting syntax in Squeak, from a fundamental and conceptual perspective.
6. How to work with the halo in a fundamental manner.
7. How to assign a script to a button.
I hope that you have enjoyed the Quick and Dirty tutorial series, and I also hope that you have been able to become more familiar with the Croquet SDK.
If you have feedback, questions or comments, please leave a comment in the comments section of this blog. I will do my best to answer your questions.


Thanks for the tutorial. I've recently picked up on Squeak/OpenCroquet and think they are mind-blowingly fantastic, however I'm having a hard time locating useful tutorials and info on the web (aside from the usual suspects, e.g. SBE), so I'll be keeping an eye open here too ;-)
ReplyDeleteGood one - keep it up!