I'm no Smalltalk guru. Anyone who reads the Croquet-Dev list can assure you of this. But when you start small with Smalltalk/Squeak's syntax (no pun intended), it's not too difficult to grasp. So, without further ado, here is the second installment in my set of Croquet tutorials.
Learning outcomes:
Upon completion of this lesson, the learner will be able to identify basic elements of a Squeak script and will be able to make minor changes to provided code examples.
Note:
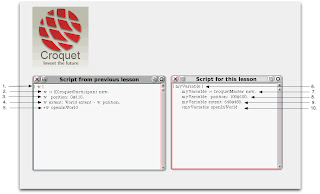
The following tutorial will use the below screenshot throughout. It is recommended to open this screenshot in another window or tab in your web browser in order to reference it during the tutorial.

You will notice that the above screenshot is annotated with numbers one through ten. Please refer to these numbers while working through the tutorial.
Tutorial:
The above screenshot provides you with two scripts. You will recognize the script in the workspace on the left from the previous lesson. The script on the right is new. We will use these two scripts to compare and contrast the various elements within them in order to gain a better understanding of what is going on with the syntax.
1. This is how you declare a variable in Squeak/Smalltalk (referred to as Squeak from now on). You can name your variable in a number of ways. Just make sure that you don't name your variable something that is reserved by the system (e.g., "win"). Note that the line ends with a period.
5. Notice that in the new script I have named my variable differently.
2. Here, I call the KCroquetParticipant subclass and assign it to the variable "w". You may find that it is easier for a beginner to read Squeak code from right to left. In this manner, you can interpret this code to mean, "Create a new instance of the KCroquetParticipant subclass and assign it to the variable 'w'."
7. Notice that in the new script I am calling a different subclass, CroquetMaster. The syntax is the same. Calling CroquetMaster will initialize a different world than KCroquetParticipant. But don't worry, we'll get to that at the end of the lesson.
3. Here, I assign a base position in the Squeak project space for where the world should launch. The number to the left of the "@" sign is the horizontal offset, in pixels. The number to the right of the "@" sign is the vertical offset. As you can see, when this script is executed, the world will launch 110 pixels below the top of the Squeak project space. Of particular note is the use of the "@" sign. You may be familiar with other programming languages that use "x" (e.g., 640x480). This is not the case with Squeak. Make a mental note of this.
8. Notice in the new script that I have changed things up a bit. When this script is executed, the world will launch 100 pixels from the left-hand side of the Squeak project space, and 100 pixels below the top.
4. Here, I assign a size for the Croquet world. This is a bit fancy, and is a nice way to show off some features of Squeak. The section "w extent: World extent" can be translated into plain English to mean, "make the size of the Croquet world just as big as the Squeak project space." So, if this line ended here, the Croquet world would take up the whole space available in the window. However, there is more to this line. The section "- w position" tells the Croquet world to subtract the position from line 3. In plain English, this code says, "make the size of the Croquet world as big as the Squeak project space, but subtract 110 pixels from the top."
9. Notice in the new script that things are a lot easier. Here, I have assigned a simple value of 640 by 480 pixels for the size of the Croquet world. You may want to start building your worlds using simple syntax like this and build up to the fancier stuff over time.
5. This last line ties everything together. You may be wondering, "What's that arrow, and where is it on my keyboard?" The up arrow is actually a caret symbol (^), which you can type in by selecting the shift key and pressing 6 on most U.S. mapped keyboards. It is displayed in Squeak as an up arrow symbol. The caret symbol is used to return a value. In this example, the variable "w" is returned and opened in the Squeak project space.
10. Notice in the new script that everything is exactly the same except for the variable name.
Now that you have spent some time investigating Squeak syntax, let's get another world running.
Step-by-Step Guide
1. Select all of the text in the workspace.

2. Alt+click and select "accept" from the contextual menu.

3. Alt+click again and select "do it" from the contextual menu.

4. You are presented with a world running the CroquetMaster subclass. Notice the offset of the world (100 pixels from the left and 100 pixels from the top), and notice the size of the world (640 pixels wide by 480 pixels high).

Summary:
In this lesson, the learner compared and contrasted two similar Squeak scripts and was introduced to some of the basic programmatic and syntactical elements of Squeak scripting. In addition, the learner launched a new world, based on the "CroquetMaster" subclass.

No comments:
Post a Comment