
Activities and artifacts of an enterprising academic interested in open education.
Monday, November 5, 2007
Croquet Crashing When Connecting to Other Worlds? Here's a Fix.
Tim Wang has posted a how-to for updating your Croquet image and fixing a bug that can cause a crash when connecting to other worlds. Thanks Tim!
Lombardi lays it down: How Croquet is different
Julian Lombardi answers a question that I have been asked a number of times in a very concise and somewhat-easy-for-non-techies-to-digest form.
How is Croquet different from Second Life?
It's about decentralization vs. centralization. It's about control of information vs. flow of information. It's about DIY (d0-it-yourself) vs. BIFM (build-it-for-me).
Doug Holton responded with this:
I also have the sense that there is a great deal of wishful thinking going on here. I will believe that Linden Labs is open sourcing their server when I have the source downloading to my machine. Further, it remains to be seen just how "open" their notion of open source will be. Take Apple as an example here. Apple used open source components to build their version of Unix--OS X. And they encouraged an open source community to contribute to their Unix derivative. But over time, the process of acquiring, modifying, and compiling code became so restrictive that the community around Darwin nearly died. There is no guarantee that this will not happen with SL server. Yes, I'm skeptical.
But why not the same skepticism over Croquet? Because I'm much more trusting a product released under an open license from the beginning. From the initial pre-release until now with the 1.0 SDK, Croquet has been completely developed in the open--and not always to the benefit of the project (recall that it's not an app).
(I understand that Linden Labs is working hard at "getting"--or perhaps more apt "groking"--open source. But they are struggling. And mistakes have been made. And they cannot seem to get away from the notion of a central authority. But that's not what this blog is about.)
In the end, I understand why people have the need to compare Croquet and SL. They share significant surface similarities. But when you look at the vision for the two products, it appears to be an apples-and-oranges type of comparison. Croquet is a framework for deep, meaningful collaboration at a distance. And SL? Well, just look at what the most purchased piece of avatar anatomy is in SL and you may start to get the sense that it is not necessarily a collaboration tool.
Perhaps the question would be more readily answered if one were to ask, "How is Croquet similar to Second Life?"
How is Croquet different from Second Life?
"Croquet makes it possible to develop any number of interlinked metaverses that can be deployed independently of a commercial authority or the constraints imposed by server-imposed resource limitations."In other words, it's all about freedom.
It's about decentralization vs. centralization. It's about control of information vs. flow of information. It's about DIY (d0-it-yourself) vs. BIFM (build-it-for-me).
Doug Holton responded with this:
[As regards Second Life] They open sourced the client and will be open sourcing the server. They include a programming/scripting interface, that can be extended (once open sourced) to just about any language (if they are still using mono).What first struck me about this post was the repeated use of the word "they," connoting that someone else is in control. When I speak of Croquet and Croquet development, I speak of "we." A community. In this example, Doug appears to be waiting for someone to grant him rights, to increase his freedom. With Croquet, there is nothing limiting me from doing what I want other than my own abilities and resourcefulness.
I also have the sense that there is a great deal of wishful thinking going on here. I will believe that Linden Labs is open sourcing their server when I have the source downloading to my machine. Further, it remains to be seen just how "open" their notion of open source will be. Take Apple as an example here. Apple used open source components to build their version of Unix--OS X. And they encouraged an open source community to contribute to their Unix derivative. But over time, the process of acquiring, modifying, and compiling code became so restrictive that the community around Darwin nearly died. There is no guarantee that this will not happen with SL server. Yes, I'm skeptical.
But why not the same skepticism over Croquet? Because I'm much more trusting a product released under an open license from the beginning. From the initial pre-release until now with the 1.0 SDK, Croquet has been completely developed in the open--and not always to the benefit of the project (recall that it's not an app).
(I understand that Linden Labs is working hard at "getting"--or perhaps more apt "groking"--open source. But they are struggling. And mistakes have been made. And they cannot seem to get away from the notion of a central authority. But that's not what this blog is about.)
In the end, I understand why people have the need to compare Croquet and SL. They share significant surface similarities. But when you look at the vision for the two products, it appears to be an apples-and-oranges type of comparison. Croquet is a framework for deep, meaningful collaboration at a distance. And SL? Well, just look at what the most purchased piece of avatar anatomy is in SL and you may start to get the sense that it is not necessarily a collaboration tool.
Perhaps the question would be more readily answered if one were to ask, "How is Croquet similar to Second Life?"
Thursday, November 1, 2007
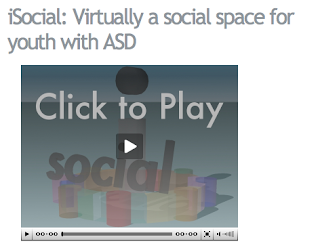
iSocial: Virtually a social space for youth with autism
 For the past few months, I've been working on a dissertation proposal that will investigate the use of a 3D Virtual Learning Environment for the treatment of autism spectrum disorders. In the process of putting together funding proposals to various granting and gifting entities, I put together a hypothetical use case and a website that outlines the project in broad terms. Since we've decided to use Squeak and OpenCroquet as the development platform for this application, it seemed appropriate to post the use case here.
From the iSocial website:
The iSocial project proposes to develop a three-dimensional virtual learning environment (3D VLE) for students who have been identified with Autism Spectrum Disorders (ASD). Participation in iSocial will enable social interaction and support the development of social competence for participation in both virtual and natural settings. The envisioned system integrates (1) a social space attuned to the capabilities and needs of students identified with ASD, (2) a curriculum of activities and scaffolding for developing social competence, and (3) a networked community for students, parents and teachers to motivate, support and sustain social interaction and progress toward social competence.
As illustrated in the video, youth will experience a 3D VLE customized to support social interaction and learning for the ASD population and adapted to the needs of the individual. The customization and adaptivity of features (e.g., representation, orthotics, and notification) and the study of the impact of that customization and adaptivity on presence, co-presence, behavior management and learning social competence guide the design and development of the system. By customization we mean being attuned to the needs and preferences of youth with ASD. For example the conversation console is a feature of iSocial customized to the needs of youth with ASD to have a mechanism for regulating some aspects of conversation, such as turn taking. By adaptivity we mean that the interface adjusts to how the social deficit or learning objective is manifest for this individual and to changes and development of the individual over time. For example, once a youth learns “turn taking” and is ready to practice this skill in conversation, the console can reduce the control it exerts or remove that feature. Similarly if a youth does not adopt the turn taking controls in the console, other forms of control can be substituted such as removing other members from view until it is the youth’s turn to speak.I am interested in feedback from anyone from the Squeak and Croquet communities.
Wednesday, October 17, 2007
Croquet Floor Textures
In the course of creating the next tutorial, I've put together some textures for your Croquet worlds' floors.
These are released under the DWTFYW license. Use as you will.
These are released under the DWTFYW license. Use as you will.
Sunday, October 14, 2007
Quick and Dirty Guide Part III: Adding a script to a button
Introduction:
In the first two parts of this quick and dirty series, you learned how to write a script to run a Croquet world, and how to execute that script within the Squeak environment. But selecting your code, doing an "accept" and "do it" every time you want to start a world can become tedious. Wouldn't it be great if you could just click a button to start your world?
That is precisely what we are going to learn how to do in this tutorial.
Learning Outcomes:
Upon completion of this lesson, the learner will be able to assign a script to a button in Squeak and change the name of the button.
Step by Step Guide:
1. Launch Squeak and open a new project.
 2. Open up an "Objects" window.
3. Select "Basic" from the "Objects" window.
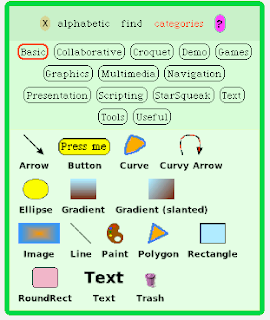
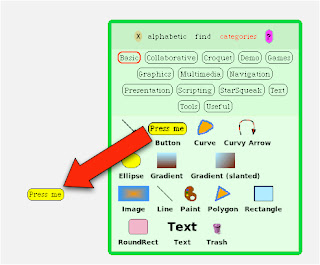
4. Click and drag the "button" icon from the "Objects" window into your workspace.
5. Command-click (or right-click) the button you just dragged into the workspace. You are presented with a halo.
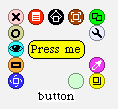
6. Select the green button towards the bottom-right of the halo. You are presented with a tile pane.
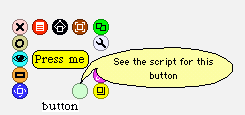
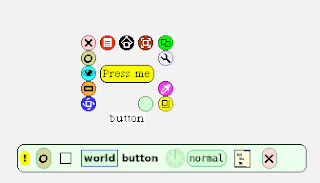
7. Click on the "world" section of the tile pane. You are presented with a contextual menu.
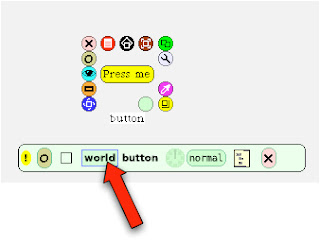
8. Select "show code textually" from the contextual menu. An editing space will appear.
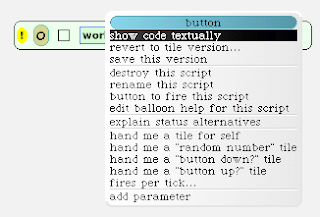
9. Delete all text in the editing space except for the word "button".
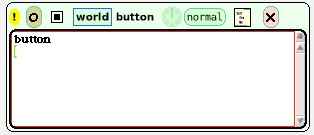
10. Copy and paste the following code into the editing space below the word "button":
 11. Select all of the text except for the word button, alt-click, and select "accept" from the contextual menu.
12. Select the "O" button (second from the left) at the top of the tile pane. This will close the tile pane.
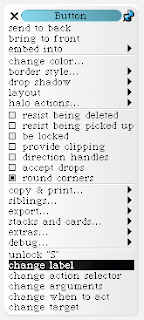
13. Since the title on the button ("press me") is not very descriptive, let's change the title. Command click (right-click) the button. You are presented with a halo. Select the "Menu" button. You are presented with a contextual menu.
14. Select "change label" from the contextual menu. You are presented with a dialogue to add a new label to your button.
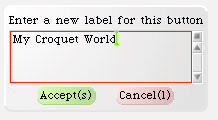
15. Provide a name for your button and select "Accept." I have chosen to name the button "My Croquet World."
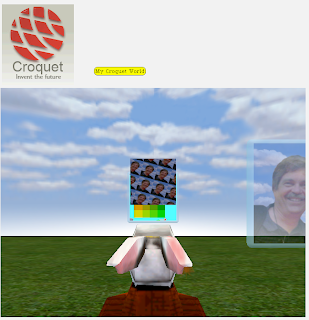
16. Success! You can now click on the button to run your script. You will be presented with a world based on the CroquetMaster subclass.
Advanced users:
Experiment with the various options using the halo and its contextual menus to create a more attractive button.
In this lesson, the learner learned to assign a script to a button in Squeak and how to change the name of that button.
Conclusion
This concludes the quick and dirty series on getting a Croquet world running. In this series, the learner acquired the following abilities regarding the core concepts of the Croquet SDK:
1. How to create a new Squeak project.
2. How to open and use a workspace.
3. How to open and use a class browser in a fundamental manner.
4. How to execute scripts in the Squeak environment ("accept" and "do it")
5. How to understand basic scripting syntax in Squeak, from a fundamental and conceptual perspective.
6. How to work with the halo in a fundamental manner.
7. How to assign a script to a button.
I hope that you have enjoyed the Quick and Dirty tutorial series, and I also hope that you have been able to become more familiar with the Croquet SDK.
If you have feedback, questions or comments, please leave a comment in the comments section of this blog. I will do my best to answer your questions.
In the first two parts of this quick and dirty series, you learned how to write a script to run a Croquet world, and how to execute that script within the Squeak environment. But selecting your code, doing an "accept" and "do it" every time you want to start a world can become tedious. Wouldn't it be great if you could just click a button to start your world?
That is precisely what we are going to learn how to do in this tutorial.
Learning Outcomes:
Upon completion of this lesson, the learner will be able to assign a script to a button in Squeak and change the name of the button.
Step by Step Guide:
1. Launch Squeak and open a new project.

 2. Open up an "Objects" window.
3. Select "Basic" from the "Objects" window.

4. Click and drag the "button" icon from the "Objects" window into your workspace.

5. Command-click (or right-click) the button you just dragged into the workspace. You are presented with a halo.

6. Select the green button towards the bottom-right of the halo. You are presented with a tile pane.


7. Click on the "world" section of the tile pane. You are presented with a contextual menu.

8. Select "show code textually" from the contextual menu. An editing space will appear.

9. Delete all text in the editing space except for the word "button".

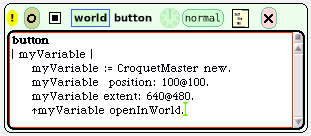
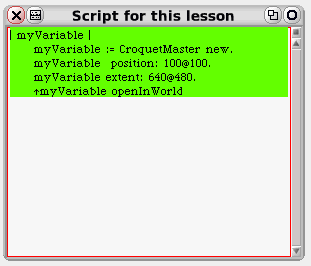
10. Copy and paste the following code into the editing space below the word "button":
| myVariable |
myVariable := CroquetMaster new.
myVariable position: 100@100.
myVariable extent: 640@480.
^myVariable openInWorld.
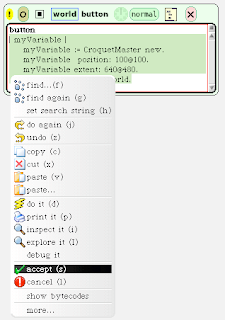
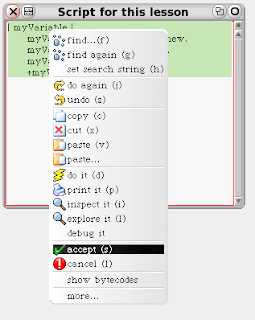
 11. Select all of the text except for the word button, alt-click, and select "accept" from the contextual menu.
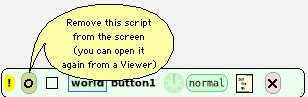
12. Select the "O" button (second from the left) at the top of the tile pane. This will close the tile pane.

13. Since the title on the button ("press me") is not very descriptive, let's change the title. Command click (right-click) the button. You are presented with a halo. Select the "Menu" button. You are presented with a contextual menu.

14. Select "change label" from the contextual menu. You are presented with a dialogue to add a new label to your button.

15. Provide a name for your button and select "Accept." I have chosen to name the button "My Croquet World."

16. Success! You can now click on the button to run your script. You will be presented with a world based on the CroquetMaster subclass.

Advanced users:
Experiment with the various options using the halo and its contextual menus to create a more attractive button.
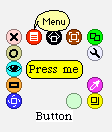
Challenge:
Can you create a button that looks like the following?

Summary:
In this lesson, the learner learned to assign a script to a button in Squeak and how to change the name of that button.
Conclusion
This concludes the quick and dirty series on getting a Croquet world running. In this series, the learner acquired the following abilities regarding the core concepts of the Croquet SDK:
1. How to create a new Squeak project.
2. How to open and use a workspace.
3. How to open and use a class browser in a fundamental manner.
4. How to execute scripts in the Squeak environment ("accept" and "do it")
5. How to understand basic scripting syntax in Squeak, from a fundamental and conceptual perspective.
6. How to work with the halo in a fundamental manner.
7. How to assign a script to a button.
I hope that you have enjoyed the Quick and Dirty tutorial series, and I also hope that you have been able to become more familiar with the Croquet SDK.
If you have feedback, questions or comments, please leave a comment in the comments section of this blog. I will do my best to answer your questions.
Thursday, October 11, 2007
Quick and Dirty Guide Part II: Squeak/Smalltalk Syntax
Introduction:
I'm no Smalltalk guru. Anyone who reads the Croquet-Dev list can assure you of this. But when you start small with Smalltalk/Squeak's syntax (no pun intended), it's not too difficult to grasp. So, without further ado, here is the second installment in my set of Croquet tutorials.
Learning outcomes:
Upon completion of this lesson, the learner will be able to identify basic elements of a Squeak script and will be able to make minor changes to provided code examples.
Note:
The following tutorial will use the below screenshot throughout. It is recommended to open this screenshot in another window or tab in your web browser in order to reference it during the tutorial.
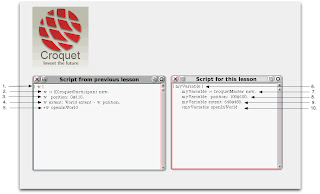
You will notice that the above screenshot is annotated with numbers one through ten. Please refer to these numbers while working through the tutorial.
Tutorial:
The above screenshot provides you with two scripts. You will recognize the script in the workspace on the left from the previous lesson. The script on the right is new. We will use these two scripts to compare and contrast the various elements within them in order to gain a better understanding of what is going on with the syntax.
1. This is how you declare a variable in Squeak/Smalltalk (referred to as Squeak from now on). You can name your variable in a number of ways. Just make sure that you don't name your variable something that is reserved by the system (e.g., "win"). Note that the line ends with a period.
5. Notice that in the new script I have named my variable differently.
2. Here, I call the KCroquetParticipant subclass and assign it to the variable "w". You may find that it is easier for a beginner to read Squeak code from right to left. In this manner, you can interpret this code to mean, "Create a new instance of the KCroquetParticipant subclass and assign it to the variable 'w'."
7. Notice that in the new script I am calling a different subclass, CroquetMaster. The syntax is the same. Calling CroquetMaster will initialize a different world than KCroquetParticipant. But don't worry, we'll get to that at the end of the lesson.
3. Here, I assign a base position in the Squeak project space for where the world should launch. The number to the left of the "@" sign is the horizontal offset, in pixels. The number to the right of the "@" sign is the vertical offset. As you can see, when this script is executed, the world will launch 110 pixels below the top of the Squeak project space. Of particular note is the use of the "@" sign. You may be familiar with other programming languages that use "x" (e.g., 640x480). This is not the case with Squeak. Make a mental note of this.
8. Notice in the new script that I have changed things up a bit. When this script is executed, the world will launch 100 pixels from the left-hand side of the Squeak project space, and 100 pixels below the top.
4. Here, I assign a size for the Croquet world. This is a bit fancy, and is a nice way to show off some features of Squeak. The section "w extent: World extent" can be translated into plain English to mean, "make the size of the Croquet world just as big as the Squeak project space." So, if this line ended here, the Croquet world would take up the whole space available in the window. However, there is more to this line. The section "- w position" tells the Croquet world to subtract the position from line 3. In plain English, this code says, "make the size of the Croquet world as big as the Squeak project space, but subtract 110 pixels from the top."
9. Notice in the new script that things are a lot easier. Here, I have assigned a simple value of 640 by 480 pixels for the size of the Croquet world. You may want to start building your worlds using simple syntax like this and build up to the fancier stuff over time.
5. This last line ties everything together. You may be wondering, "What's that arrow, and where is it on my keyboard?" The up arrow is actually a caret symbol (^), which you can type in by selecting the shift key and pressing 6 on most U.S. mapped keyboards. It is displayed in Squeak as an up arrow symbol. The caret symbol is used to return a value. In this example, the variable "w" is returned and opened in the Squeak project space.
10. Notice in the new script that everything is exactly the same except for the variable name.
Now that you have spent some time investigating Squeak syntax, let's get another world running.
Step-by-Step Guide
1. Select all of the text in the workspace.
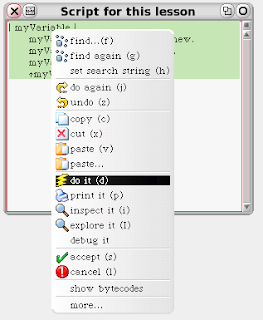
2. Alt+click and select "accept" from the contextual menu.
3. Alt+click again and select "do it" from the contextual menu.
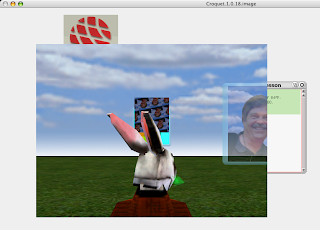
4. You are presented with a world running the CroquetMaster subclass. Notice the offset of the world (100 pixels from the left and 100 pixels from the top), and notice the size of the world (640 pixels wide by 480 pixels high).
Summary:
In this lesson, the learner compared and contrasted two similar Squeak scripts and was introduced to some of the basic programmatic and syntactical elements of Squeak scripting. In addition, the learner launched a new world, based on the "CroquetMaster" subclass.
I'm no Smalltalk guru. Anyone who reads the Croquet-Dev list can assure you of this. But when you start small with Smalltalk/Squeak's syntax (no pun intended), it's not too difficult to grasp. So, without further ado, here is the second installment in my set of Croquet tutorials.
Learning outcomes:
Upon completion of this lesson, the learner will be able to identify basic elements of a Squeak script and will be able to make minor changes to provided code examples.
Note:
The following tutorial will use the below screenshot throughout. It is recommended to open this screenshot in another window or tab in your web browser in order to reference it during the tutorial.

You will notice that the above screenshot is annotated with numbers one through ten. Please refer to these numbers while working through the tutorial.
Tutorial:
The above screenshot provides you with two scripts. You will recognize the script in the workspace on the left from the previous lesson. The script on the right is new. We will use these two scripts to compare and contrast the various elements within them in order to gain a better understanding of what is going on with the syntax.
1. This is how you declare a variable in Squeak/Smalltalk (referred to as Squeak from now on). You can name your variable in a number of ways. Just make sure that you don't name your variable something that is reserved by the system (e.g., "win"). Note that the line ends with a period.
5. Notice that in the new script I have named my variable differently.
2. Here, I call the KCroquetParticipant subclass and assign it to the variable "w". You may find that it is easier for a beginner to read Squeak code from right to left. In this manner, you can interpret this code to mean, "Create a new instance of the KCroquetParticipant subclass and assign it to the variable 'w'."
7. Notice that in the new script I am calling a different subclass, CroquetMaster. The syntax is the same. Calling CroquetMaster will initialize a different world than KCroquetParticipant. But don't worry, we'll get to that at the end of the lesson.
3. Here, I assign a base position in the Squeak project space for where the world should launch. The number to the left of the "@" sign is the horizontal offset, in pixels. The number to the right of the "@" sign is the vertical offset. As you can see, when this script is executed, the world will launch 110 pixels below the top of the Squeak project space. Of particular note is the use of the "@" sign. You may be familiar with other programming languages that use "x" (e.g., 640x480). This is not the case with Squeak. Make a mental note of this.
8. Notice in the new script that I have changed things up a bit. When this script is executed, the world will launch 100 pixels from the left-hand side of the Squeak project space, and 100 pixels below the top.
4. Here, I assign a size for the Croquet world. This is a bit fancy, and is a nice way to show off some features of Squeak. The section "w extent: World extent" can be translated into plain English to mean, "make the size of the Croquet world just as big as the Squeak project space." So, if this line ended here, the Croquet world would take up the whole space available in the window. However, there is more to this line. The section "- w position" tells the Croquet world to subtract the position from line 3. In plain English, this code says, "make the size of the Croquet world as big as the Squeak project space, but subtract 110 pixels from the top."
9. Notice in the new script that things are a lot easier. Here, I have assigned a simple value of 640 by 480 pixels for the size of the Croquet world. You may want to start building your worlds using simple syntax like this and build up to the fancier stuff over time.
5. This last line ties everything together. You may be wondering, "What's that arrow, and where is it on my keyboard?" The up arrow is actually a caret symbol (^), which you can type in by selecting the shift key and pressing 6 on most U.S. mapped keyboards. It is displayed in Squeak as an up arrow symbol. The caret symbol is used to return a value. In this example, the variable "w" is returned and opened in the Squeak project space.
10. Notice in the new script that everything is exactly the same except for the variable name.
Now that you have spent some time investigating Squeak syntax, let's get another world running.
Step-by-Step Guide
1. Select all of the text in the workspace.

2. Alt+click and select "accept" from the contextual menu.

3. Alt+click again and select "do it" from the contextual menu.

4. You are presented with a world running the CroquetMaster subclass. Notice the offset of the world (100 pixels from the left and 100 pixels from the top), and notice the size of the world (640 pixels wide by 480 pixels high).

Summary:
In this lesson, the learner compared and contrasted two similar Squeak scripts and was introduced to some of the basic programmatic and syntactical elements of Squeak scripting. In addition, the learner launched a new world, based on the "CroquetMaster" subclass.
Wednesday, October 10, 2007
Controlling Croquet with a Wii Remote on Big Displays
My colleague, Sean Goggins, and I put together the following video on controlling Croquet using a Wii remote.
For fun, we decided to use the projector on my deck (great for evening movies in the summer!) as our display. When we started getting eaten alive by the Missouri mosquitoes, we took the experiment to my basement wide screen flat panel display.
Enjoy!
For fun, we decided to use the projector on my deck (great for evening movies in the summer!) as our display. When we started getting eaten alive by the Missouri mosquitoes, we took the experiment to my basement wide screen flat panel display.
Enjoy!
Quick and Dirty Guide to Launching a Croquet World
OK, as promised, here is the first installment of how to get a simple world running in Croquet.
Learning outcomes:
Upon completion of this lesson, the learner will be able to successfully initiate the KCroquetParticipant subclass from within Squeak.
Step by Step Guide
Note: This guide was made under OSX. If you are running Croquet under Windows or Linux, your results may vary.
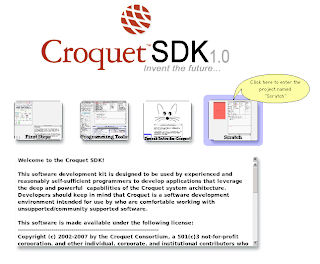
1. Launch the Croquet image
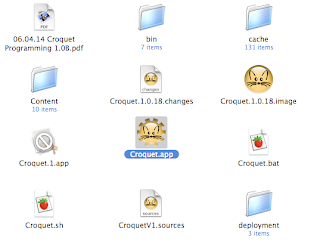
2. Click on the "Scratch" project. You will be presented with a new desktop. For simplicity's sake, close all windows on this project "page."
3. Open up a workspace. Advanced users may also want to open a class browser.
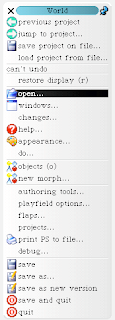
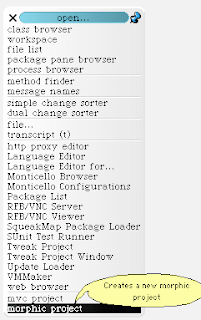
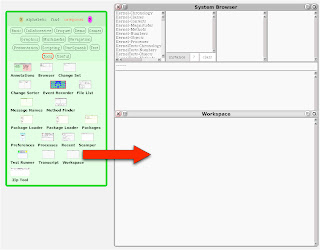
3.1. To open a workspace, left click on the Squeak desktop, select "open..."-->"workspace."
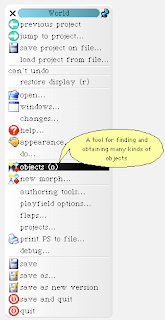
Alternately, Alternately, left click on the Squeak desktop, and select "objects." You are presented with a green "Objects" window. In the "Objects" window, select "Tools" (if you receive an error to the effect of "The map on disk is more than 10 days old. Update it from the Internet?" or something similar, go ahead and select "yes"). Left click and drag the "Workspace" button from the "Tools" section of the "Objects" window onto your Squeak desktop.
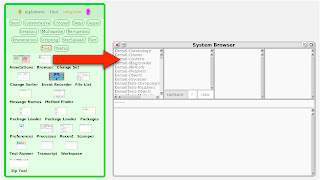
3.2. Advanced users: to open a package browser, left click on the Squeak desktop and select "open..."-->"class browser" from the menu.
Alternately, from the "Tools" section of the "Objects" window, left click and drag the button labeled "Browser" onto your Squeak desktop.
4. Copy the below text and paste it into your workspace window. Don't worry about the particulars of the following script. The goal of this lesson is just to get a simple world to load.

Now alt-click the selected text. You are presented with a contextual menu. Select "accept" from this menu.
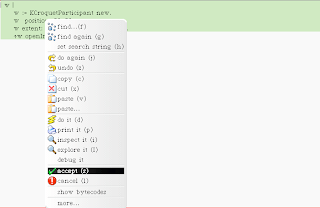
Now alt-click the selected text again. You are again presented with a contextual menu. Select "do it" from this menu.
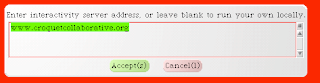
You should be presented with a dialogue stating "Enter interactivity server address, or leave blank to run your own locally." Delete the text in the dialogue's text box and select "Accept."
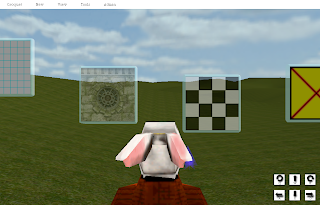
In a few moments, you should be presented with the below Croquet world.
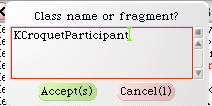
6. Advanced users: You may want to investigate the code for the world that you just initiated. To do this, return to the "System Browser" window. Alt-click in the left-most pane of the window. You are presented with a contextual menu. From this menu, select "find class."
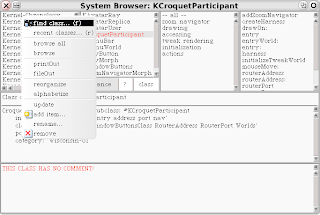
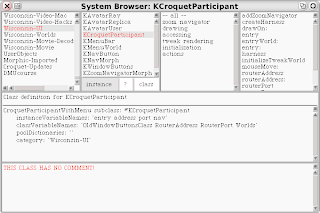
Enter "KCroquetParticipant" into the search field and select "Accept."
You are presented with the subclass "KCroquetParticipant." Discussion of this subclass is beyond the scope of the current lesson. A deeper investigation of the underlying structure of the objects, classes, subclasses, instances, and methods of the Croquet system will be presented in a future lesson.
Summary
In this lesson, the learner interfaced with the Squeak system in order to execute a script which is used to launch a simple Croquet world, based on the University of Wisconsin's "KCroquetParticipant" subclass.
Learning outcomes:
Upon completion of this lesson, the learner will be able to successfully initiate the KCroquetParticipant subclass from within Squeak.
Step by Step Guide
Note: This guide was made under OSX. If you are running Croquet under Windows or Linux, your results may vary.
1. Launch the Croquet image

2. Click on the "Scratch" project. You will be presented with a new desktop. For simplicity's sake, close all windows on this project "page."

3. Open up a workspace. Advanced users may also want to open a class browser.
3.1. To open a workspace, left click on the Squeak desktop, select "open..."-->"workspace."
Alternately, Alternately, left click on the Squeak desktop, and select "objects." You are presented with a green "Objects" window. In the "Objects" window, select "Tools" (if you receive an error to the effect of "The map on disk is more than 10 days old. Update it from the Internet?" or something similar, go ahead and select "yes"). Left click and drag the "Workspace" button from the "Tools" section of the "Objects" window onto your Squeak desktop.

3.2. Advanced users: to open a package browser, left click on the Squeak desktop and select "open..."-->"class browser" from the menu.
Alternately, from the "Tools" section of the "Objects" window, left click and drag the button labeled "Browser" onto your Squeak desktop.

4. Copy the below text and paste it into your workspace window. Don't worry about the particulars of the following script. The goal of this lesson is just to get a simple world to load.
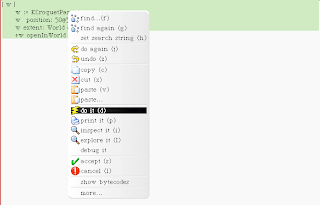
| w |5. Now it is time to initiate the world. First, select all of the text that you just copied into your workspace.
w := KCroquetParticipant new.
w position: 50@50.
w extent: World extent - w position.
^w openInWorld

Now alt-click the selected text. You are presented with a contextual menu. Select "accept" from this menu.

Now alt-click the selected text again. You are again presented with a contextual menu. Select "do it" from this menu.

You should be presented with a dialogue stating "Enter interactivity server address, or leave blank to run your own locally." Delete the text in the dialogue's text box and select "Accept."

In a few moments, you should be presented with the below Croquet world.

6. Advanced users: You may want to investigate the code for the world that you just initiated. To do this, return to the "System Browser" window. Alt-click in the left-most pane of the window. You are presented with a contextual menu. From this menu, select "find class."

Enter "KCroquetParticipant" into the search field and select "Accept."

You are presented with the subclass "KCroquetParticipant." Discussion of this subclass is beyond the scope of the current lesson. A deeper investigation of the underlying structure of the objects, classes, subclasses, instances, and methods of the Croquet system will be presented in a future lesson.

Summary
In this lesson, the learner interfaced with the Squeak system in order to execute a script which is used to launch a simple Croquet world, based on the University of Wisconsin's "KCroquetParticipant" subclass.
Wednesday, October 3, 2007
Croquet documentation sucks
My name's Matt and welcome to Xaverse.
OK, so maybe I'm being overly critical, but where's a decent how-to?
I mean a how-to for building your own world.
Common folks need a decent how-to. I don't need to be told RTFM after I've read it twice.
That's what this blog is for. Stay tuned. I'll be posting my experiences and lessons as I continue to explore, design, and develop with this exciting software.
Subscribe to:
Posts (Atom)