I have witnessed quite a few folks asking how they can get VNC running within a Croquet world. Thanks to the excellent KCroquetParticipant subclass, getting VNC up and running within a Croquet world is a fairly easy task. However, to date, nobody has provided a reasonable explanation for non-technical users to perform this task. This tutorial will instruct you on how to do just this.
An explanation of what VNC is and why it is useful is beyond the scope of this tutorial. For more information on VNC, a good starting point is at the Wikipedia entry for VNC.
Learning Outcomes
Upon completion of this tutorial, you will be able to run a VNC server on a host computer, and connect to that VNC server from within a Croquet world.
Prerequisites
In order to complete this tutorial, you will need the following software:
1. REQUIRED: A VNC server. Below are some options that are free of cost:
- Vine VNC Server (Mac): http://sourceforge.net/projects/osxvnc/
- TightVNC (Windows): http://www.tightvnc.com/
- Real VNC (Windows): http://www.realvnc.com/products/free/4.1/index.html
- For Linux, many distributions provide their own package of "vncserver." Check your particular distribution's documentation and man pages for information on installation and configuration.
3. RECOMMENDED: The latest build of the Croquet SDK, available here.
Step by Step Guide
Mac OS X was used to create this tutorial. Much of the information herein should be readily transferable to other operating environments; however, your results may vary.
Part 1: Steps for VNC server computer
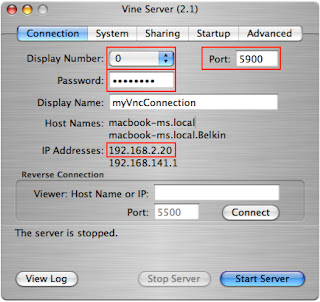
1. Open your VNC server software and configure it (in this case, we are using Vine Server).
The important values to note are:Write these values down so that you can reference them later.
- IP Address
- Display Number
- Port
- Password
 Note the values outlined in red, as
you will need them when you are
configuring the VNC client in Croquet.
Part 2: Steps for Croquet Computer
1. Launch Croquet and open the KAT Demo (this is the KCroquetParticipant subclass)
 Locate the KAT Demo in the Objects browser.
 Drag the KAT Demo icon from the Objects browser into the Squeak
project space (click image to enlarge).
 You are presented with the above dialogue. Select "Cancel."
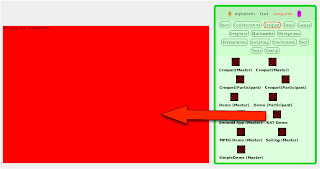
 After a few moments of loading, you are presented with
the above Croquet world (click to enlarge).
2. Configure and start VNC from within the Croquet world.
2.1 From the menu, select "Admin-->New raw RFB"

2.4. Enter the password; then select "OK."

2.5. You should be presented with a Croquet window showing the desktop of the computer on which you are running a VNC server.

You may want to spend some time playing with Croquet's VNC implementation, as it does have some quirks.
 Congratulations! You've gotten VNC to work in a Croquet world.
Demo
Here is a video demonstrating VNC being used in a Croquet world.
Summary
In this tutorial, you learned how to start and configure a VNC server on one computer, and how to access that VNC server from within a Croquet world that is running on a separate computer.
2.1 From the menu, select "Admin-->New raw RFB"

2.4. Enter the password; then select "OK."

2.5. You should be presented with a Croquet window showing the desktop of the computer on which you are running a VNC server.

You may want to spend some time playing with Croquet's VNC implementation, as it does have some quirks.
 Congratulations! You've gotten VNC to work in a Croquet world.
Demo
Here is a video demonstrating VNC being used in a Croquet world.
Summary
In this tutorial, you learned how to start and configure a VNC server on one computer, and how to access that VNC server from within a Croquet world that is running on a separate computer.


